How Do I Continue a Numbered List After Bullet Points in Google Docs
- Home
- IT Resources
The popularity of Google Docs has been growing because it's easy to access. Since you can open your documents from any device, as long as you are connected to the internet, you don't have to worry about carrying around a laptop or thumb drive — both of which can get lost or stolen.
In addition, Google Docs gives you the freedom to create a wide range of documents, from essays to newsletters. It is also equipped with different features for formatting to ensure your final product looks good, including the ability to add bullet points. This may have you wondering how to move bullet points in Google Docs.
If you are looking for a way to make your Google Doc more sophisticated and easier for your audience to read, thenadding bullet points , and learning how to move bullet points in Google Docs, is a must. While traditional bullet points in Google Docs will get your point across, you can also create custom bullet points Google Docs, taking your text to a whole new level.
Not only can you create and edit bullet points on your desktop or laptop computer, but you can also access documents and make changes using your smartphone.
Whether you're asking about the Google Docs bullet points shortcut, Google Docs bullet points indent, or any other questions about bullet points, we've got you covered. Get ready to take your documents to a whole new level!
How to Add Bullet Points to Your Google Doc
Before we get into answering the question about how to move bullet points in Google Docs, we need to start at the beginning. We start with the steps you'll need to follow to add bullet points to your document. We'll also talk about how to add sub-bullets in Google Docs and other topics to make your bullet points outstanding.
Step 1: Open Google Docs
The first thing you'll need to do when wondering how to add bullet points, before asking how to move bullet points in Google Docs, is to open your Google Docs account .
If you haven't already typed in your username and password, you will be asked to do that.
Once you've accessed your account, you'll then need to find the document you want to add bullet points to. If you've already created it, double click on it to open it.
To create a new document, you'll want to click the "New" button in the upper left-hand corner of the screen.
Step 2: Choose a Page
After you've opened an existing document or created a new one, before learning how to move bullet points in Google Docs, you'll need to insert them into your text.
Go to the page where you want the bullet points to be displayed and place your cursor in the exact location.
Step 3: Insert the Bullet Points
You have a couple of different options when it comes to inserting bullet points into your document.
The first is that you can go to the Format tab on the toolbar at the top of the page. When you click on this, it will open a drop-down menu, and you'll want to click "Bullets & numbering."
If you truly want bullets , you'll then choose "Bulleted list" from the list that has opened on your screen.
Yet another window will open, and you'll be able to choose the style of bullets that will be inserted into your document. Knowing which one to use will depend on personal style and how you want your final product to look.
Another option you have when it comes to inserting bullets into your document is to use a Google Docs bullet points shortcut. This can be found in your toolbar as well.
On the far-right side of your screen, you should see an icon that has dots and lines next to it. This is the symbol for a bulleted list. If you don't see it among the other symbols, you may need to click the three dots to bring up more options.
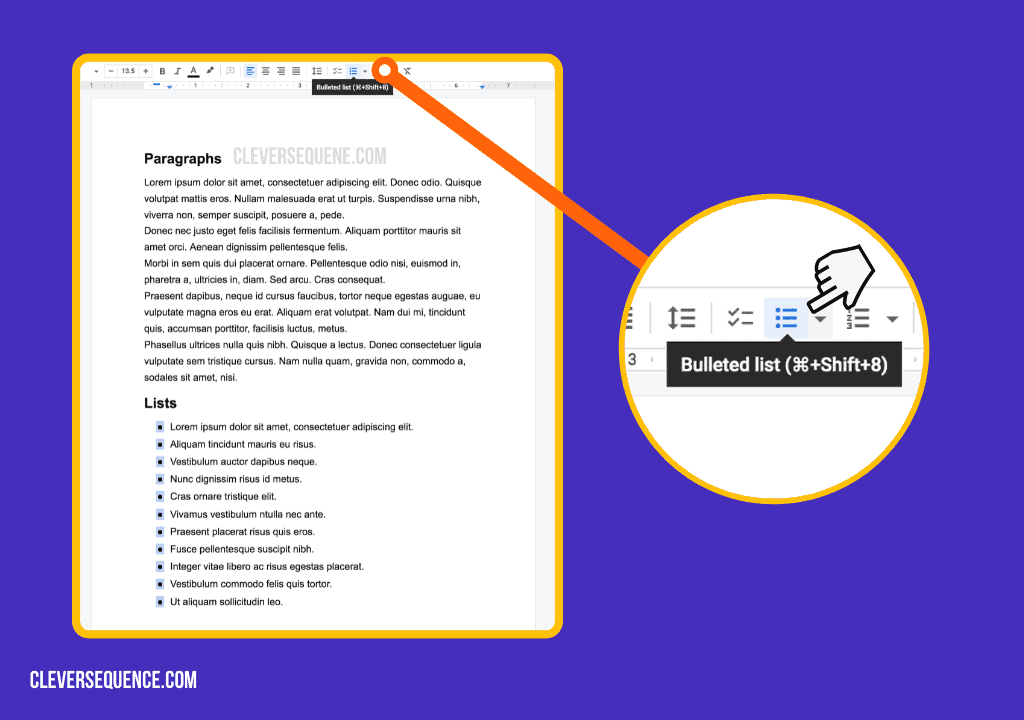
After finding the bulleted list icon, you can click on the down arrow to display your bullet options and choose which one you want.
Click on a box, and the bullets will automatically be inserted into your document.
There is one more option when it comes to a Google Docs bullet points shortcut, and that's to use your keyboard to insert the bulleted list. Typing "Ctrl+Shift+8" on a PC will automatically add a bulleted list to your document.
With this option, it comes in the default round bullets, but there is a way you can change them if you need to. We'll talk about that later.
How to Move Bullet Points in Google Docs
Now that you know how to add bullet points to your document, you can learn how to move bullet points in Google Docs. We'll show you the steps for how to do this using your laptop or desktop computer, as well as your mobile phone.
The steps we show you below will also answer the question about how to add sub-bullets in Google Docs. This is useful if you need to show subcategories or ideas under your main topics, and Google Docs will automatically change how the bullet looks based on the style you choose when you first inserted them into your document.
Step 1: Open Google Docs
If you aren't already in Google Docs, you'll need to log in to your account and find the document you are wondering how to add sub-bullets in Google Docs to.
Step 2: Click on the Bulleted List or Create a New One
After accessing your Google Docs, you can then go to a bulleted list that you've already created or insert a new one.
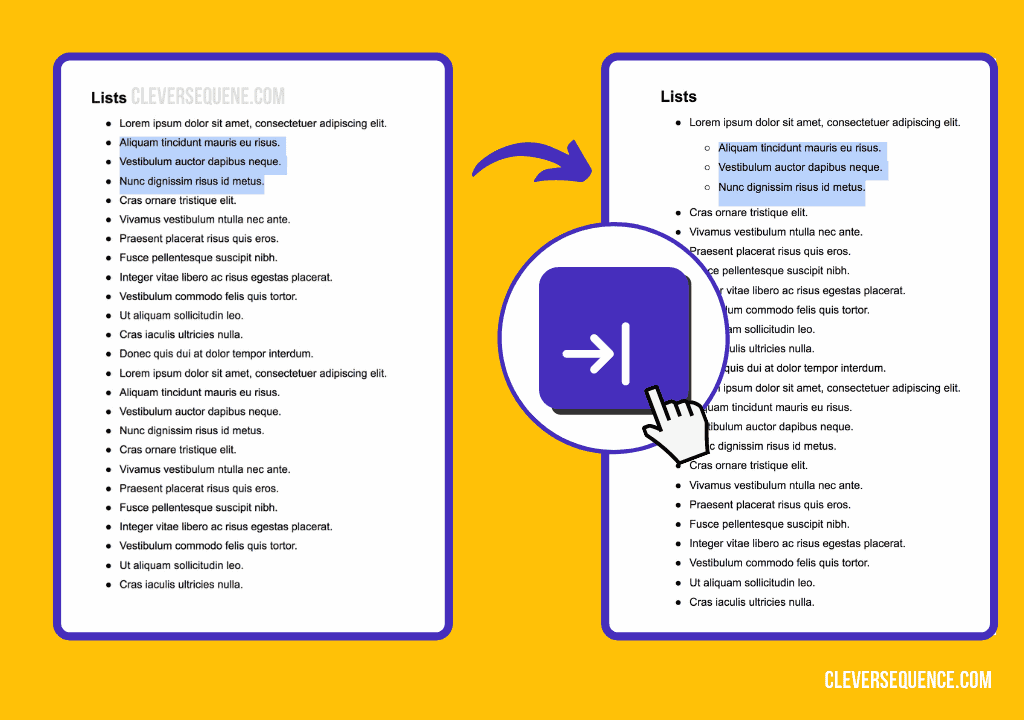
Step 3: Move the Bullets Using Tab or "Increase Indent"
When attempting to add a Google Docs bullet points indent, you'll need to go to the line you want to add the information and then hit the tab key.
This should automatically create a new bullet point that is nestled under the main topic.
The more times you hit the tab, the further across the page you will be taken. The style of the bullet will change each time, but you may notice that it recycles some of the same shapes the farther you go.
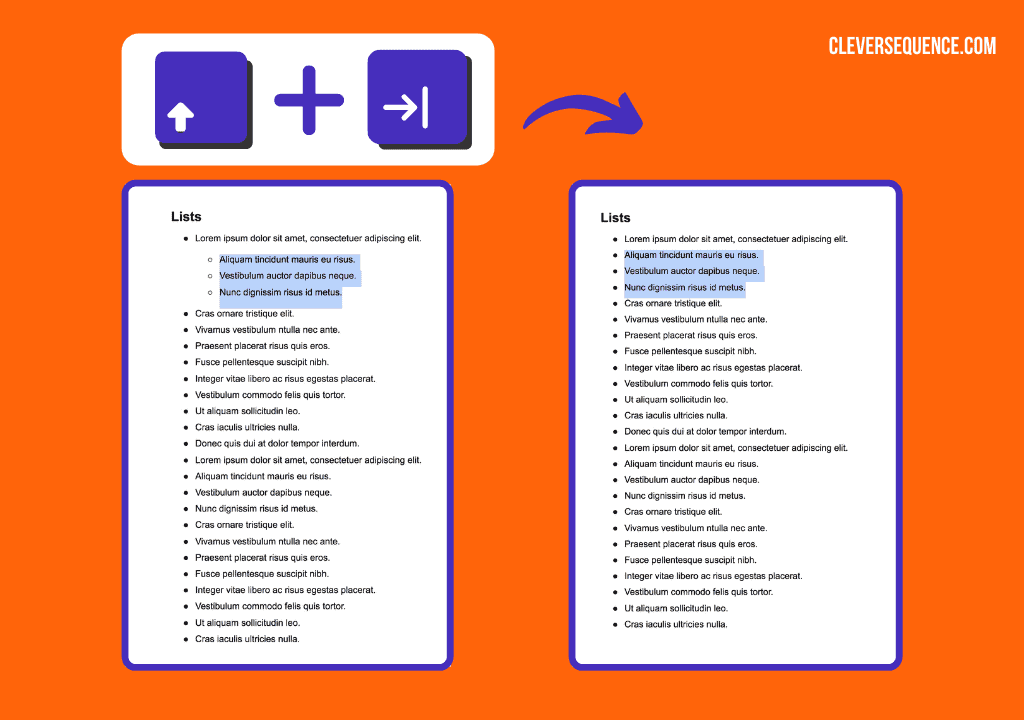
To move bullet points one cell to the left, press the Shift key + Tab
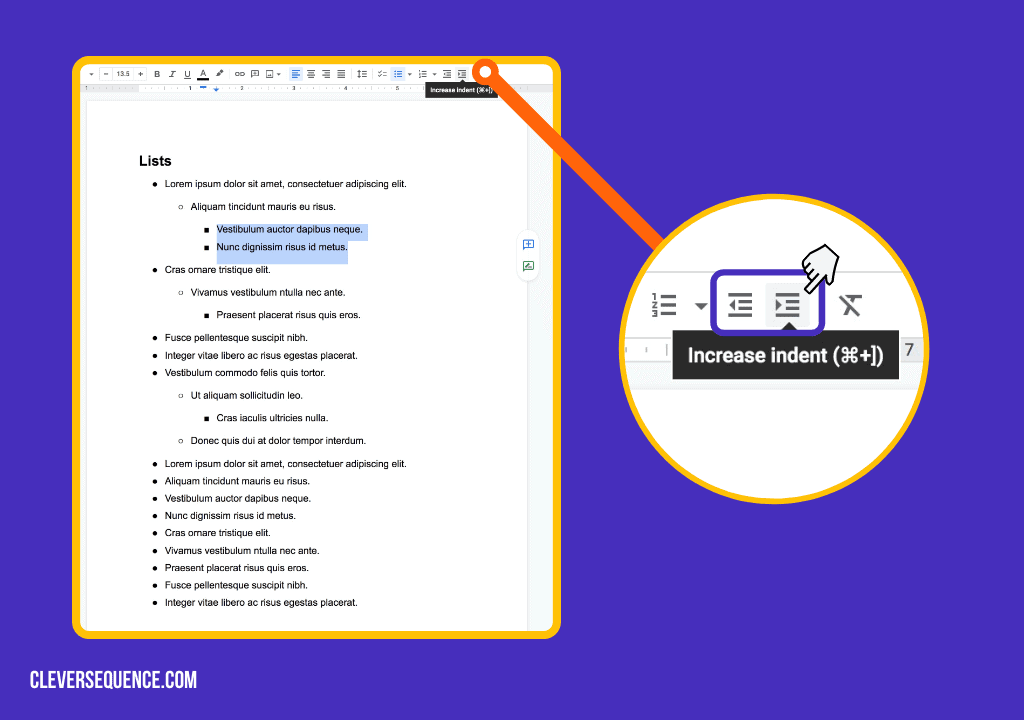
In addition to hitting the tab key on your keyboard, another option you have when wondering how to move bullet points in Google Docs is to use the "Increase indent" icon.
This can be found on your toolbar at the top of the page. If you don't see it with the other icons, you may need to hit the three dots on the far right to bring up the rest of the menu options.
The "Increase indent" option has several lines with an arrow that points to the right. Click on this to create a Google Docs bullet points indent.
Manually move your bullet points
You can also manually move you bullet point by just dragging the left indent marker to where you wish.

How to Indent the Second Line in Google Docs
While indenting an entire paragraph can be beneficial when it comes to making text stand out, you might also be wondering how to indent the second line in Google Docs to make your information stand out. To achieve this formatting goal, you'll follow these steps:
Step 1: Access Your Google Docs
Open Google Docs from your favorite browser and look for a document that has already been created from your list. Double-click on it to open it.
For new documents, click on the "New" button in the upper left-hand corner and add your information.
Step 2: Find the Paragraph
To add a second line indent to your document, you'll then need to find that paragraph you want to format and either highlight the entire thing or just place your cursor somewhere in the text.
Step 3: Change the Formatting
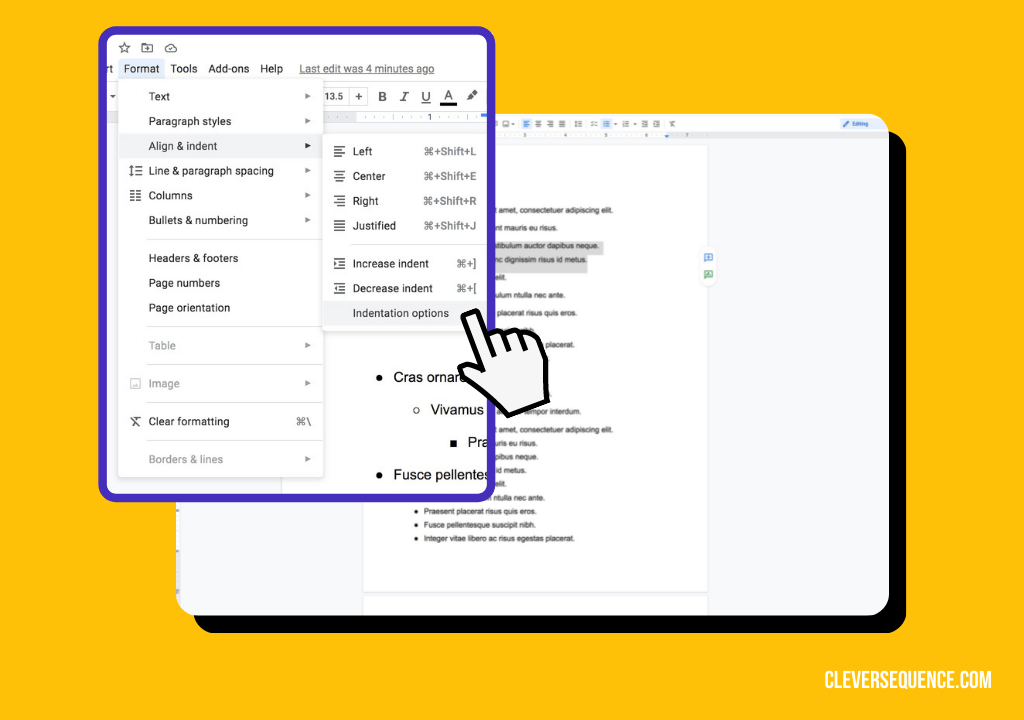
Click on the Format option in the toolbar at the top of the page.
Step 4: Click "Align & Indent"
When the drop-down menu appears, choose "Align & indent" from the list.
Step 5: Go to "Indentation Options"
In the new menu, click on "Indentation options" at the bottom of the list.
Step 6: Go to "Special Indent"
A new window will appear, and you'll want to go to the "Special indent" section.
Click the arrow on the dialogue box and click "Hanging." Typically, a second line indent stops at the half-inch mark, but you can make it larger or smaller depending on your needs by typing a number in the second box.
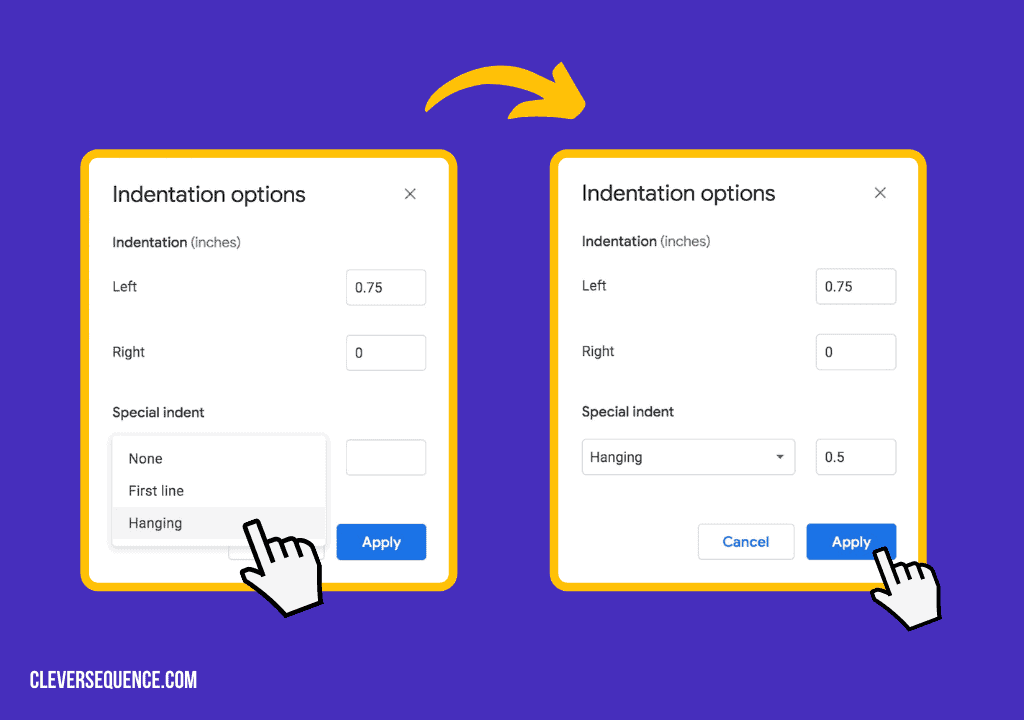
Step 7: Apply
Click the "Apply" button to have the second-line indent formatting automatically applied to your document.
You can also use this formatting if you are asking how to move bullet points in Google Docs and want the second line of a main point or sub-point indented farther than the default.
Creating Custom Bullet Points Google Docs
The steps listed above allow you to insert bullet points in a Google Doc while using a laptop or desktop computer, but it's possible to add them on your smartphone as well. You'll want to follow these steps when using your phone:
Step 1: Open Google Docs
As always, the first thing you need to do when inserting or moving bullet points is to open your Google Docs.
For documents that have already been created, look for them in your list and double-click on them. For documents that need to be created, click on the "New" button on the left-hand side of the screen.
Step 2: Click on the Bulleted List
Once you have accessed your document, you'll then need to go to the bulleted list that has already been created or create a new one.
Highlight the bullets you want to change.
Step 3: Click on Format
At the top of the page in the toolbar, look for and click on the Format option. There is no Google Docs bullet points shortcut for creating a custom bullet point.
Step 4: Choose "Bullets & Numbering"
When the drop-down menu appears, look for and click on the "Bullets & numbering" option.
Step 5: Choose "List Options"
A new drop-down menu will appear, and you'll want to click on "List options," which is at the top of the list.
Step 6: Add More Bullets
Yet another menu will open, and near the bottom will be "More bullets." Once you click on this, you'll see a new window with a variety of different options to choose from.
Find the symbol that you find appealing or create your own in the "Draw symbol here" box. You won't actually be able to use the symbol you draw, but Google Docs will offer some symbols that are close that you can add to your bulleted list.

Step 7: Choose Your Symbol
Once you find a symbol you like and want to use as a bullet, click on it. The bullet points in your document will automatically be changed.

Step 8: Close the Special Characters Menu
Once you have found the symbol that you want to use as your bullet points, you'll close out of the "Insert special characters" menu by clicking the "X" in the upper right-hand corner.
Inserting Bullet Points Using Your Phone
The steps listed above allow you to insert bullet points in a Google Doc while using a laptop or desktop computer, but it's possible to add them on your smartphone as well. You'll want to follow these steps when using your phone:
Step 1: Open Google Docs
Before you can use the Google Docs bullet points shortcut on your phone, you need to open your Google Docs app. Android | IOS
Look for the Drive icon, which is a multi-colored triangle in a white circle, and click on it.
Once it has been opened, if you have already created the document, you'll need to find it in your list. Should you need to create a new document, you'll click on the multi-colored plus sign in a white circle at the bottom right of your screen.
If you've already created the document, to be able to make edits and add a bulleted list, you'll need to click on the pencil icon on the bottom right-hand side of the screen.
Step 2: Add Bullet Points
You'll know you have the ability to edit your Google Doc because the cursor will be flashing on the screen. At this point, you can add bullet points to your doc on your mobile phone by clicking the bullet point list by clicking on the icon with three dots and three lines.
Adding Sub-Bullet Points on Your Phone
If you are working in Google Docs on your phone, you are probably wondering how to indent in Google Docs app. These are the steps you'll want to undertake:
Step 1: Open the App
The first thing you'll need to do when wondering how to indent in Google Docs app is to find it and open it on your phone.
Look for the multi-colored triangle in a white circle.
Once it's open, you'll then need to open the document that contains the bullet points or create a new one.
Step 2: Go to the Line that Needs to be Indented
Whether your list has already been created or you are in the process of creating it, you'll need to go to the line that will need to be indented.
Step 3: Click the "Increase Indent" Button
Once you are on the line that needs to be indented, when learning how to indent in Google Docs app, you'll then need to click the "Increase indent" button. This can be accessed in a couple of different ways.
There is a toolbar at the bottom of your screen, and you'll want to look for the lines with an arrow that points to the right when asking how to tab on Google Docs mobile.
Related: How to Rotate a Picture on Google Docs
Click on this and your cursor will automatically be indented, answering your question about how to move bullet points in Google Docs while using your phone.
If you can't find the icon on the toolbar, the other option is to click on the "A" with lines next to it at the top of the screen.
When the menu opens on the bottom, click on the "Paragraph" tab. Under this menu, you should see the "Increase indent" icon. Click on it from here to add a sub-bullet to your document.
Another option you have in addition to asking how to indent in Google Docs app is to decrease the indent. This can help you return to a main-level bullet point.
To do this, you'll need to click on the "Decrease indent" button. This icon has lines and an arrow that points to the left.
It can be accessed from the main screen on the toolbar at the bottom or by going to the "A" with lines menu, clicking on "Paragraph" and then click on the "Decrease indent" button.
Other Functions of the "Increase Indent" Button
The "Increase indent" button is useful when asking how to indent in Google Docs app, but it can also help when you are wondering how to tab on Google Docs mobile.
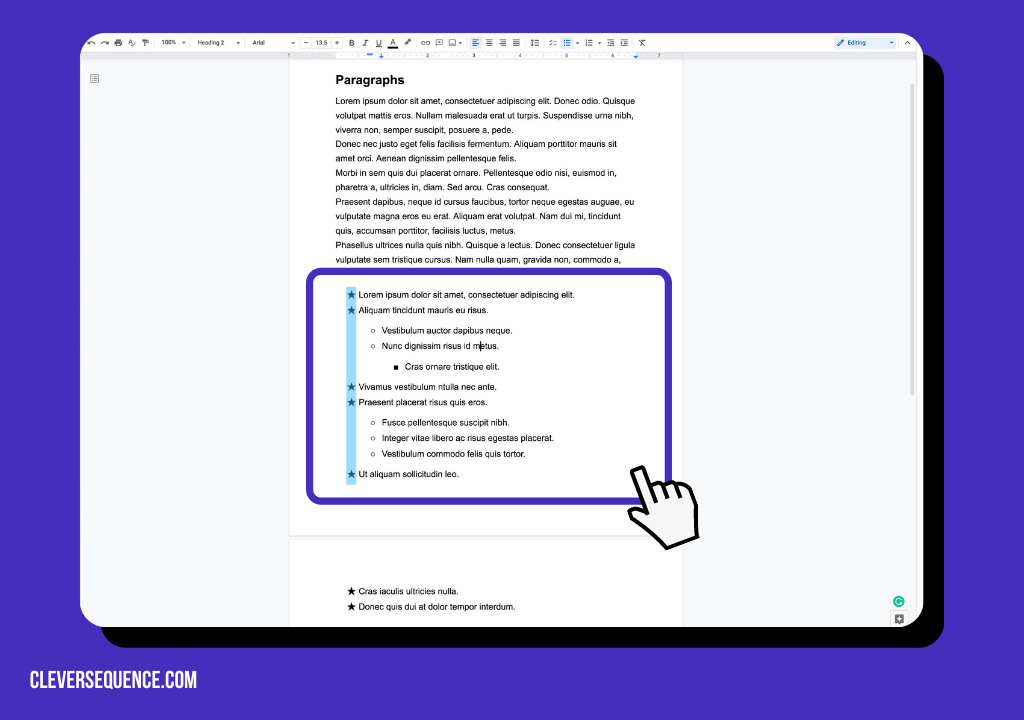
Not only can this help you create sub-bullets on your bulleted list, but it can also be used for paragraphs to have them stand out from the rest of the text.
When asking how to tab on Google Docs mobile, this option will indent the whole paragraph, not just the first line.
Some Tips for Indenting Bullet Points
If you find yourself wondering how to indent a paragraph on Google Docs, the "Increase indent" button can help you. One thing to keep in mind is that it will increase the entire paragraph, not just the first line. However, this may be beneficial if you want to set this information apart from the rest of the text and make it easier for your readers to find.
Here are the steps for how to indent a paragraph on Google Docs:
Open Google Docs
Before learning how to indent a paragraph on Google Docs, you first have to be able to access your account. If you aren't already logged in, type in your username and password.
Find or Insert the Paragraph
When asking how to indent a paragraph on Google Docs, you'll need a paragraph. If it's already been typed, find it in the document. If it needs to be created, take the time to do that.
You can then highlight all of the text or just put your cursor somewhere among the words.
Click the "Increase Indent" Button
After finding or inserting the paragraph, when wondering how to indent a paragraph on Google Docs, you'll then click on the "Increase indent" button.
This icon can be found on the toolbar at the top of your page, and it consists of lines with an arrow that points to the right.
Your entire paragraph will automatically be indented. You can move it as far across the page as you prefer by clicking the "Increase indent" button numerous times.
Creating a Well Formatted Document
Adding bullet points to your document is a great way to organize your information and make it easier for your audience to read. If you find yourself asking how to move bullet points in Google Docs, you'll follow these steps:
- Step 1: Open Google Docs
- Step 2: Click on the Bulleted List or Create a New One
- Step 3: Move the Bullets Using Tab or "Increase Indent"
The above article may contain affiliate links, which help support Clever Sequence
Source: https://cleversequence.com/how-to-move-bullet-points-in-google-docs/
0 Response to "How Do I Continue a Numbered List After Bullet Points in Google Docs"
Post a Comment